Rather than tying a series of cues together with follows and links, select Options then press the IS CHASE property. When a Playlist is a chase all the Cue times are hidden (and ignored) because each cue becomes a step and steps advance in beat time measured in BPM. Also note in the Play toolbar (the green bar above the Select/Control/Record/Play Task Bar) that Timecode becomes inactive and the RATE and CHASE tools become active:

The left hand side of the Play toolbar showing the Playlist name will no longer have the Go icon but rather show what type of chase it is (Forward, Reverse, Bounce or Random. See Direction below).
![]()
As mentioned above, cue timing is irrelevant when a Playlist is a chase. Each cue is now a step in the chase and a beat clock will advance from one step to the next automatically without the need for setting the Follow properties in each cue.

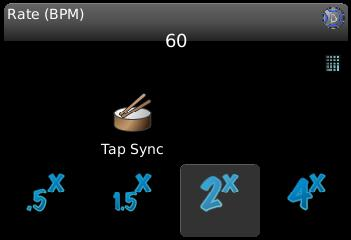
Rate - The rate is measured in Beats
Per Minute (BPM). So, if the chase is running at 60 BPM, each second will
advance to a new step. Roll the blue
D ![]() wheel
to adjust
the rate in real time or touch the control and type in a specific rate.
wheel
to adjust
the rate in real time or touch the control and type in a specific rate.
Tap Sync - If you’re synchronizing to music and you can hear the beat, tap this button in time to adjust the rate. The rate will be updated after three taps and will show in the Rate bubble. Sometimes it’s useful to tap in time to the music for a bit, then watch the stage with your hand on the blue wheel and subtly adjust the time to get it just right.
Multipliers - The bottom row of four buttons multiplies the Rate. This is useful when busking a show to give a different feel to an underlying look by doubling or halving the base time. When you touch these buttons, the Rate value shown does not change. Only one of these can be down at a time and to go back to the prescribed rate, press any active button to deactivate the multipliers.
This screen can adjust (in real time) how the chase is played back and may be a good screen to stay on when busking a show. You can build the chase steps in any order but alter how they hit the stage using this screen.

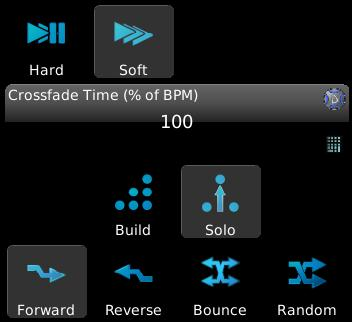
Direction - The bottom four buttons change the direction of the chase, either Forward (top down), Reverse (bottom up), Bounce (down then up then down again) or Random. Only one of these options can be selected at any one time. Remember, there is no need to assign Links to any cues. The Direction will take care of figuring out which step comes next in the sequence.
Build/Solo - Chases run in either one of these modes. In regular Playlists, if you set the level of (say) Light #1 in Cue 1 and don’t do anything else when you record Cue 2, Light #1 will still be on. This “Build” (or “Tracking”) behaviour is how all Playlists work when not running as a chase. If you change to the “Solo” option, if an intensity is not explicitly recorded in a cue, the light will return to its default levels. (That may be 0% if nothing else is driving it.)
Crossfade Time - This value may be typed in or you can use the Blue wheel to adjust the value between 0% and 100%. If your beat time is 60 and Crossfade Time is 100%, each step will take one second to fade to its recorded values before directly moving to the next step. If you change the Crossfade Time to 0%, then each step will be on stage for one second before snapping to the next step in zero time. If you set the Crossfade Time to 50%, it will take 0.5s to fade from one step to the next, hold that level for 0.5s then move on to the next.
Hard/Soft - These are shortcut keys to set Crossfade Time to 0% and 100% respectively.
Having the four directions, the crossfade options and the Build/Solo parameters really makes a single set of cues very versatile. Remember, as long as the Playlist is not Locked for Editing, you can press the EDIT (pencil) button and move the order of the cues to mix it up even more.